Why Linux Rocks For Photography

If you’re a photographer, Linux may not be the first thing that leaps into your mind for managing your images.  That is your loss, my friend, both financially and in terms of functionality.

I originally got into Linux mainly for surfing on the internet because Linux didn’t run all those wildly popular Windows viruses and trojans that were circulating in the days when Windows XP was king and Windows 2000 was reaching the end of its days.  But the more I used it, the more I started to discover functionality and automation that made managing images a lot easier.

Oh, I’ve got a Windows laptop, mainly for watching movies, but also for video work.  For photography, it would be tough to move away from Linux.  There are two tools that I’d be lost without.

ImageMagick

When I’m on assignment I may take hundreds of pictures a day.  At the end of grueling day behind the camera, most photographers still have to sort their images, make contact sheets and send them off to whoever is paying them that day.

Not me.  I can dump all my images into a folder and kick off a script that does all that automatically.  The script I’ve written goes through every image in the folder and makes a backup to an external drive, then resizes it to proof size, renames the image adding “_small” to  the name, converts it to a JPEG, runs basic color correction, moves the image into a special folder.  When all the images are processed it then takes all the small images in that folder and adds them to a zip file and FTP’s the zip file to a location of my choosing and sends an email to the customer letting them know the zip file is there for the taking.

About ten minutes after starting that script, I’m down at the bar where, strangely, you’ll find many other photographers after a hard days work.  But I get there first because, while they’re up proofing their shots for the day, my Linux laptop is handling all that for me.  All thanks to a batch script and ImageMagick.

Digikam

Digikam is a little bit Photoshop and a little bit LightBox.  Just like the big boys, Digikam works with 16 bit color depth in RAW files.  It’s got a built-in image database that automatically scans your image folders looking for new pictures.  When it finds them, it adds them to your collection and lets you run a bewildering array of special filters on them.

Like ImageMagick, Digikam has a feature called Queues that let you process images in batches.  Unlike ImageMagick, Digikam uses a GUI to manage batch work.

For screen shots and a more complete look at Digikam features, take a look at: Digikam – The image program your Windows buddies wish they had Article

Its a great feeling to make to achieve more faster.  Thanks to Linux.

June 18th, 2011 by chris in Linux | Comment (1)

The Operating System Is Irrelevant

You may be reading this on an iPad running iOS 4.3.  Did you know that? Did you care?  Linux?  Android?  Windows?  What difference does it make?  Really, none.

All you care about are your applications.  Reading email, watching a movie, browsing the web, listening to music.  Where does the operating system figure in to that list?  Nowhere.  Sure, it might come into play if there was a particular application you really wanted and that application only ran on a specific OS.  That’s the only time it might matter, the majority of the time people are not going to care.  They care about email, movies, music, reading and doing things.

We’re also moving into an era of low-cost applications, many costing $2-$3 dollars or less.  How big of a hit would it be if you bought a different model of phone and had to pay for those apps all over again?  It would hurt, maybe gripe a little, but it’s not the end of your financial world.

The age of $150 dollar operating systems running on an $800 desktop box carrying applications that cost $200 is coming to an end and the real question is if anyone will even notice when it happens?

These days the operating system is just a convenience for your applications.  Many of those applications don’t do much beyond phone home to a server somewhere and deliver data back to your phone, iPad or tablet device.  Even applications aren’t running on your device operating system, they’re running somewhere in “the cloud”.  Your phone is just a platform with a screen and input device.

So, what does that mean for the future of companies specializing in expensive operating systems and applications?  As speculated in many places on the web nothing good.  For now desktops still have a place and as laptops become more powerful, the age of expensive desktop applications is likely to drag out for a few more years.  But the end is in site and there’s a certain inevitability forming around the transition.

Fewer companies are investing in big, desktop software systems.  Witness Apple laying off 40 percent of their Final Cut Pro developers.  Developers themselves are jumping ship from desktop applications to apps for smart phones.  The whole concept of a software development company is starting to change.  When one or two developers can get together and make millions off a game for iPads, who needs an employer?

Regardless of the reasons, the change is a good one for consumers.  More choices means more competition and more competition means lower prices.  And we’re one step closer to the day when data and applications are more like a utility than a product.  Plug it, turn it on and go. Just like it should be.

June 17th, 2011 by admin in Linux | No Comments

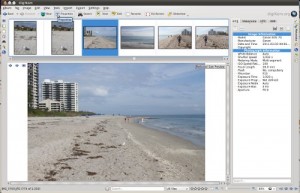
Digikam – The image program your Windows buddies wish they had

DigiKam - Your Windows buddies should be so lucky

DigiKam - Your Windows buddies should be so lucky

Sadly it’s difficult to get Digikam to run under Windows.  It can be done, but it’s a painful exercise.  That leaves Digikam as one of the jewels of open source applications only available to Linux users.  I don’t use Linux and Digikam for lack of other options, I use them for image work because I haven’t found anything better.

I use Digikam to organize my image files, trim, edit, run batch processes, include watermarks and just generally keep my image libraries organized.

A few of my favorite features:

16 Bit Per Channel Editing

Just like the big boys.  16 bit per channel color depth.  You can spend hundreds of dollars for a program that does the same thing, or get Digikam for the cost of a Ubuntu CD (which is free) and a Digikam download (also free).

This is nearly a must have for photographers working with RAW files.

The Light Table

One of the features I like most about Digikam is being able to pull images from different portfolios on to the light table for side-by-side work.

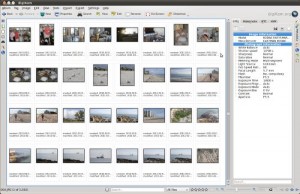
Advanced file browsing and image search functions in DigiKam

Advanced file browsing and image search functions in DigiKam

It makes it easy to mix photos for a new job without moving them out of their original folders.  I’d be lost without the light table and it’s one of my favorite features, giving me the ability to scan large numbers of images and pull out copies of the ones I want in one convenient place, review the metadata, launch the editor and anything else one normally does in the program window.

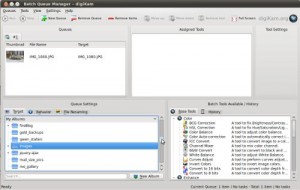
Queues

Digikam also lets me scan large image collections and add specific images to queues.  Queues are how Digikam opens up all the program functions to you for batch conversions.

DigiKam queues for batch processes

DigiKam queues for batch processes

Dozens of color correction filters, resizing, converting, add a watermark almost anything you can do from the program interface, you can do from the queue and apply to a whole selection of images.

Calendar Tool

Sort of old fashioned in these days of iPhones and Google Calendar, but it’s a neat feature all the same.  There’s sort of a retro appeal to an old fashioned print calendar and what better than one featuring your own pictures.

Slide Show

Create an MPEG slide show from your photos and burn it on to a CD or DVD.

Key Word Tagging

Tagging and ratings that help me search for images across directories.  I can classify them by event, and Digikam can automatically place all the images I took on a certain day on a list.

Rotate Image Based on EXIF Information

Certain cameras record the orientation of the camera when they take a pictures. Digikam can read this information and automatically orient your pictures (if you enable this feature).

So a quality photo editing application and a world class operating system, all for free.  Worth a try, don’t you think?

DigiKam processed HDR image

DigiKam processed HDR image

June 17th, 2011 by chris in Linux | Comments (2)

Ubuntu 11.04 Update Manager Could not initialize the package information.

I have been running the latest Ubuntu 11.04 for about a month now, and the update manager was always working like a charm, though I had an error few days back when trying to update my Ubuntu using Ubuntu Update Manger. The error was as follow:

Could not initialize the package information. Please report this bug agaist the ‘update-manager’ package that include the following error message:

‘E:Encoutered a section with no Package: header, E:problem with MergeList /var/lib/apt/lists/ae.archive.ubuntu.com_ubuntu_dist_natty_main_binary-amd64_Package, E:The package lists or status files could not be parsed or opened.’

A snapshot image of the error is showing below:

ubuntu-update-manager-could-not-initialize-the-package-information1

As I fuzzed with the error for two days, I thought I will share how I resolved it with other Ubuntu users in the community to make sure they are well on in no time. below is the commands I have ran that resolved the above problem & should work out for you too:

sudo rm /var/lib/apt/lists/* -vf
sudo apt-get update

After that just run the Ubuntu Update Manager, & you should be all ready to go.

Enjoy using Ubuntu & happy updating.

Ubuntu is like any other distro of Linux is also greatly used by many of the best 10 web hosting and is referred to as LAMP at times. Linux, Apache, MySQL and PHP are all great solutions to using Linux for a web hosting alternative. Its great that the community always respond to such Linux bugs with fixes in a very quick manner, that has always kept Linux the most spread webhosting platform.

June 15th, 2011 by Eiad in Ubuntu | Comments (56)

The Battle Is Over – Linux Won

It wasn’t that many years ago that every year was “the year of Linux”.  That was the year we were going to gain enough credibility to topple the giant of proprietary operating systems.  That was the year we were going to break 1 percent of the market!  Yeah!  Always there was the constant, amused recounting of OS sales by the Windows faithful, we went back and forth constantly.  The mouse and the elephant.

That was what?  Seven or eight years ago?  The heady days of 2004 when the first version of Ubuntu, 4.10 the Warty Warthog, burst on the scene.  Seems funny now, doesn’t it?  Linux has clawed its way to near 2 percent of the desktop market but the reason it’s funny now is those numbers are no longer relevant.  The battle is over, decided by forces that ultimately had nothing to do desktop numbers.

The desktop market is entering its twilight phase in computer history, edged out by an exploding array of inexpensive phones, mobile devices, tablets, and specialty devices such as ebook readers, many of them running some variation of Linux.  If you were paying attention, you could see it coming.  Japan was where the device market started to take hold and, once it got going, it just kept on growing.  Still growing today.
Read more…

June 15th, 2011 by chris in Linux | No Comments

VMware Workstation 7.1.3 on Ubuntu 11.04 Unable to build Kernel Module

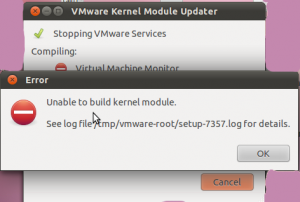
After Upgrading my Ubuntu the other day to Ubuntu 11.04 (Natty Narwhal), My VMware Workstation 7.1.3 that was working perfectly before the upgrade stopped working and kept throwing the following error when trying to compile its modules with the new Kernel: “Unable To Build Kernel Module see log file /tmp/vmware-root/setup-7357.log for details.” Below is a screen shot of the lovely error message:

Ubuntu 11.04 VMware Workstation 7.1.3 error

Ubuntu 11.04 VMware Workstation 7.1.3 error

I have followed the error instruction and checked the log file setup-7357.log pointed out by the error message shown above  to find the following messages:

================ setup-7357.log Messages===========

May 30 01:31:39.932: app-139993976203040| Trying to find a suitable PBM set for kernel 2.6.38-8-generic.

May 30 01:31:39.933: app-139993976203040| Building module vmmon.

May 30 01:31:39.933: app-139993976203040| Extracting the sources of the vmmon module.

May 30 01:31:39.939: app-139993976203040| Could not extract source for module vmmon!

==================

I have fuzzed trying to fix the above error and to get my VMware Workstation 7.1.3 back up and running but without any luck. I have looked all over the forums and the web in general without an answer. I did not expect to find too much as Ubuntu 11.04 has not been released for long. Though I end up resolving the problem by upgrading VMware Workstation to 7.1.4 and Few Extra commands. Below is the full procedure.

  1. Download VMware Workstation 7.1.4 (VMware-Workstation-Full-7.1.4-385536.x86_64.bundle) from VMware website
  2. Install VMware Workstation 7.1.4 by executing the following command as a root or by using Sudo:

# ./VMware-Workstation-Full-7.1.4-385536.x86_64.bundle    <== if running as a root

# sudo ./VMware-Workstation-Full-7.1.4-385536.x86_64.bundle <== if not running as root and the recommended method. You will be asked for your root password.

3. The installer will remove VMware Workstation 7.1.3 and replace it with VMware Workstation 7.1.4 (Just follow the normal on screen installation instruction.

4. After upgrading your VMware Workstation to 7.1.4, now VMware Workstation should be able to start normally on Ubunut 11.04 (Natty Narwhal), thhough you might get the following error when trying to power on your VMs.

Could not open /dev/vmmon: No such file or directory.
Please make sure that the kernel module `vmmon’ is loaded.

The above error I was more familiar with as it usually happens due your VMware services have not been started yet. You can execute the below commands to fix the error:

$ su –                           <== Enter your root password and hit enter.
# service vmware start


After this you should be able to start your VMware Workstation VMs normally & enjoy the latest VMware Workstation & Ubuntu.

I believe the above problems are not limited to Ubuntu 11.04 but will be hitting most Linux Distros running kernel 2.6.38-8-generic or higher, so it should be applicable to many other distros. Further the solution presented, should be applicable to other distros as well.

May 30th, 2011 by admin in Ubuntu | Comments (2)

Ubuntu 10.10 top 10 items to further enjoy the Ubuntu Experience

Ubuntu has been so far the best distro I have tried when looking for a windows desktop alternative. The massive repository & ease of usage Ubuntu has to offer makes it a great windows replacement. I have been running Ubuntu on my laptop for the past two months & have been really enjoying the speed & easiness of Ubuntu. Below is a great 10 tips to enjoy Ubuntu even further.

:

:

First Tip: Install GIMP

GIMP does not come by default with Ubuntu anymore, though its quite easy to install from the respo. Before I explain how to install GIMP for those of you new to Linux GIMP is a great image editing software with many many advance image editing features that only available in paid software on windows. Further GIMP is free so get it now!!  All you have to do to install GIMP in Ubuntu is to run the below command:

sudo apt-get install gimp

:

:

Second Tip: Install Skype

Well, most of you already know this great Voip software. It help you save on long distance calls, by allowing you to place a Voip calls over the Internet to any normal phone or mobile phone for very reasonable prices. Further, you can do pc-to-pc video & voice calls for free. If you are coming from Windows then you more than likely are aware of Skype. Installing it on Ubuntu is as easy as running the below command:

sudo apt-get install skype

:

:

Third Tip: Enable Ubuntu Repositories

As I mentioned earlier Ubuntu Repositories is one of the greatest features in Ubuntu, it will allow you to install the software you desire with easy. Ubuntu has its own repositories & partners repositories. To ensure you have the widest range of software available at your hand with easy, you would want to enable both Ubuntu own repositories & their partners repositories. To do that you will need to follow the below steps:

From the top menu in Ubuntu:  Applications => Ubuntu Software Center

In the Ubuntu Software Center from the edit tab on top choose Software Sources

Check mark the repositories you want to use under the Ubuntu Software & Other Software Tabs. I usually check mark all of them, beside the source code one.

:

:

Fourth Tip: Install Restricted Extras

Although most things in Linux world is free & open source, there still many things you want that run propriety code & not free so forth are not installed by Ubuntu by default unless you instructed it do so during the installation. Though many of these propriety software are free &  still great items & needed by most users (at least I use quite few of these all the time: Flash, Codecs, etc). If you are new to Ubuntu then I would recommend you install these to enjoy the real experience. All you have to do to install these magical restricted extras is to run the below command.

sudo apt-get install ubuntu-restricted-extras

:

:

Fifth Tip: Install VLC

I am not sure how others feel about this one, but for me VLC is much much superior to the default Ubuntu video player which is Totem. I am not saying Totem is bad, but I enjoy VLC much better as it has never failed me where Totem did. To enjoy your video playing to the max go ahead and get this free Video Player VLC by  running the below command:

sudo apt-get install vlc mozilla-plugin-vlc

:

:

Sixth Tip: Install Opera Browser

If you are in a country or an environment where Internet access is so restrictive Opera Browser is a great & easy way to run under the radar. Opera Turbo mode will cache all the pages you are viewing on their own servers & project it to you as its coming from the Opera site instead of the originating source which get your pages to display nonetheless of your Internet provider restrictions. Follow the below steps to install Opera on your Ubuntu 10.10

Download Opera 11 .deb package from http://www.opera.com/download/

Double Click the .deb package & follow the installation instructions

:

:

Seventh Tip: Install Elementary-Nautilus

The default Ubuntu Nautilus is a quite nice files & directory browser, but who mind to have a better and cleaner look by installing Elementary-Nautilus. Get Elementary Nautilus by running the below commands:

sudo add-apt-repository ppa:am-monkeyd/nautilus-elementary-ppa

sudo apt-get update

sudo apt-get dist-upgrade

:

:

Eight Tip: Make sure your Ubuntu is up to date

As every other operating system to avoid any security risk or suffering a bug that has already been fixed, ensure you update your Ubuntu Distro regularly by following the below steps:

From the System menu in the top Ubuntu bar choose Administrations => Ubuntu Manager

Hit check for updates to check for updates, then hit install updates to install any available new updates.

:

:

Ninth Tip: Install Wine

If you got to miss few of your Windows games/software, you don’t have to go back to Windows as many of them will run just fine under Wine. For more info about Wine please check: Wine Info

:

:

Tenth Tip: Find an alternative to Windows Only Application

Ok, although there is many windows emulators software on Linux that allow you to run Windows application on Linux. There is a big chance that an application exist for Linux with a much better functionality & stability than its Windows counter part. So try to use the alternatives when they are available. Example on this will be GIMP is a much much better replacement to Windows Paint.

I hope the above Tips help some of you complete your shift to Ubuntu, & help you further enjoy the experience.

December 17th, 2010 by admin in Ubuntu | Comment (1)
How to enable Java jre1.6.0_21 firefox plugin in SUSE Linux 11.3

After having to fuzz for a while trying to get Java Plugin enabled for Firefox in my SUSE Linux Enterprise Desktop 11.3, I have decided to document it on my blog. Unfortunately the instruction on the Java/SUN/Oracle site is misleading probably for being out dated & did not work for me. Below is what I have done to get it working:

First: If you have not installed Java yet then follow the below instructions to install it else skip to the second step

a. download it from Java Download Site

b. At the terminal: Type: su
c. Enter the root password.

d. Change to the directory in which you want to install. Type:
cd
For example, to install the software in the /usr/java/ directory, Type:
cd /usr/java

Note about root access: To install the JRE in a system-wide location such as /usr/local, you must login as the root user to gain the necessary permissions. If you do not have root access, install the JRE in your home directory or a subdirectory for which you have write permissions.

e. Change the permission of the file you downloaded to be executable. Type:
chmod a+x    jre-6u21-linux-x64-rpm.bin

f. Verify that you have permission to execute the file. Type:
ls -l

g. To start the installation process, type:
./jre-6u21-linux-x64-rpm.bin

Note: If the file is in the current directory, prepend it with “./”

This displays a binary license agreement. Read through the agreement. Press the spacebar to display the next page. At the end, enter yes to proceed with the installation. type YES to agree to the license agreement

h. Wait the installation to complete

Second: Link to the Firefox plugin in order for Java to work in FireFox:  (This is the part that is outdated on the Java website)

In order for Java to work in recent versions of Firefox you will need to create a link to the Java plugin depending on which firefox arch you run (32 bit/64bit) the plugin can be located in one of the two below locations:

for 32 bit: ${JAVA_HOME}/jre/lib/i386/libnpjp2.so

for 64 bit: ${JAVA_HOME}/jre/lib/amd64/libnpjp2.so

for 32 bit Place links to the plugin in /usr/lib/mozilla/plugins using the below command

ln -s ${JAVA_HOME}/jre/lib/i386/libnpjp2.so /usr/lib/mozilla/plugins/libnpjp2.so

ex: ln -s  /usr/java/jre1.6.0_21/lib/i386/libnpjp2.so /usr/lib/mozilla/plugins/libnpjp2.so

for 64 bit Place links to the plugin in /usr/lib64/mozilla/plugins using the below command

ln -s ${JAVA_HOME/jre1.6.0_21/lib/amd64/libnpjp2.so /usr/lib64/mozilla/plugins

ex: ln -s /usr/java/jre1.6.0_21/lib/amd64/libnpjp2.so /usr/lib64/mozilla/plugins

After that restart your Firefox, & you should be up and running. if you want to ensure that Firefox has found the Java plugin you can type about:plugins         in the Firefox browsing bar & the Java plugin should be listed among your plugins.

I hope this help!!! & happy Java surfing!!!


October 3rd, 2010 by admin in Suse | Comment (1)

“Too Late, Windows 7” – OneRepublic feat. Timbaland – “Apologize” Parody

Did you suffer with Vista for two years & switched to Apple Mac or anyother platform? haha was Microsoft too late for you. This is exactly what this video is about. Its a video that you must watch. Don’t miss it.

Please leave your comment below & share this video with your friends :).

November 8th, 2009 by admin in Mac | No Comments

Google Chrome OS beta is ready to download

As many of you had seen a preview of Google Chrome OS on my blog about a month back. I am glad to announce that a beta has just been released to public. The announcement has been made on Google Chrome Website & can be found at:  Google Chrome OS Beta release announcement . Ah not to mention I love the idea of google providing a virtual appliance to run on VMware Player for people to try their OS without having to install it. I believe it is a quite smart idea & will help the testing to spread a lot faster. Ah they still offer an installable version of the beta though :). So enjoy the ride.

Below is what had came on Google announcement Description:

About Chrome OS

2009-10-05: New Chrome OS 0.4.220 beta is available!

Chrome OS is a brand new free operating system built around the revolutionary Google Chrome browser.
The project aim is to provide a lightweight Linux distribution for the best web browsing experience.
Featured software in Chrome OS:
  • GNOME 2.24 desktop environment
  • Google Chrome 4.0.220 web browser
  • OpenOffice.org 3.0 office suite
  • GIMP 2.6 image editor
  • Flash Player 10.0 plugin
  • and much more!
System requirements of Chrome OS:
  • Processor: Intel Pentium, Xeon or newer; AMD Duron, Athlon, Sempron, Opteron or newer
  • RAM: min. 256 MB
  • Hard disk: min. 1 GB
  • Graphics card: supports most modern graphics cards
Download Chrome OS virtual appliance and give it a try!
Ah as well few good screenshots of the OS can be seen below:
Google Chrome OS Beta Booting
Google Chrome OS Version Screen
Well, what are you waiting for go and get the Google Chrome OS Virtual appliance and start testing the future OS :).
Please leave feedback of your Chrome OS Testing in the comments :).
October 24th, 2009 by admin in Google Chrome OS | No Comments